Though you might be able to make a great game or app using just the console, the best looking games and apps usually use images! In this tutorial you’ll be learning how to render images to the screen on the 3DS using sf2dlib. sf2dlib allows you to use hardware rendering, here is a post of mine about the difference between hardware rendering and software rendering.
If you haven’t installed sf2dlib yet read the tutorial on how to do so!
As we’re using sf2dlib we’re also going to be using a different Makefile and thus a different template from the Hello World! tutorial. Download the sf2dlib template.
Before we can start coding we first need an image to work with. For this tutorial we will be using this image:
This image is currently in .png form, though there are ways on using .png and loading those, we are going to convert this image in to c source for this tutorial. This might sound complicated but really isn’t! You can use GIMP (A free image editor) to export this image in C source format!
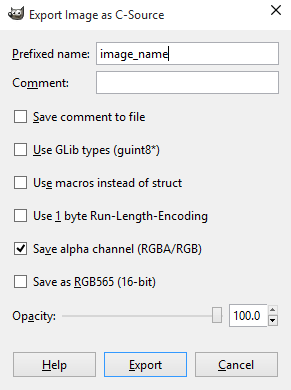
To do so first load the image in GIMP, you can even use GIMP to create the image! Once you’ve loaded th image you can go to File->Export As, Then change the name to the filename you want .c. So for instance I have called my file image.c. Set the export destination to be your source folder. You’ll get a pop-up with a few options, you want it to be setup like this:
Where the image_name is the name you are going to use in your code.
Open your .c file you just created and change this “static const struct {” with “const struct {“, you’ll have to do this for every image created with GIMP.
We first want to define the existence of the image. We have to do this before the main function.:
extern const struct {
 unsigned int width;
 unsigned int height;
 unsigned int bytes_per_pixel;
 unsigned char pixel_data[];
} image_name;
This says that these things will be defined externally (they are defined in the image source file). You will replace image_name, with whatever the name you choose in GIMP was. You will have to do this for every image file you’re going to use. You can also make a header file with all of these in there and include it in you main.c, that way the main.c is less cluttered. But for this tutorial as we’re only going to be using this one image, it’ll fine to put this code in the main.c file.
This does not however actually make the image useable, to load the image for actual use we use this:
sf2d_texture *tex_image = sf2d_create_texture_mem_RGBA8(image_name.pixel_data, image_name.width, image_name.height, TEXFMT_RGBA8, SF2D_PLACE_RAM);
We put this line before the while (aptMainLoop()) loop, and inside of the int main() function. But we also have to remove these images from memory when the user closes our homebrew, to do this we have to put this line after the main loop:
sf2d_free_texture(tex_image);
Now for the fun stuff, actually rendering the image! This is actually really easy, all we have to do is this before we swap the buffers:
sf2d_start_frame(GFX_TOP, GFX_LEFT);
 sf2d_draw_texture(tex_image, 0, 0);
 sf2d_end_frame();
This will render the image on the top screen, GFX_LEFT means it will render this image for the left eye, in a future tutorial we will be using GFX_LEFT and GFX_RIGHT to create a 3D effect! All rendering has to be done in between the start frame and end frame functions. The sf2d_draw_texture function works with first the image (texture) you want rendered followed by the X and Y position where you want the texture to be rendered. As the image used in this tutorial is the same size as the 3DS’ top screen the position has been set to 0,0 (the top left of the screen, like most other computers).
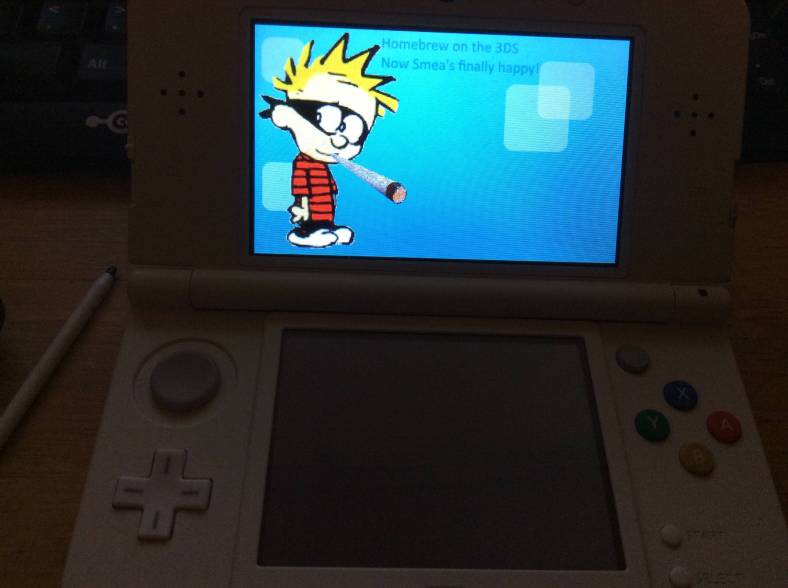
You’re now done! You can compile this and put it on your 3DS, and it’ll look something like this!
Your final main.c should look something like this:
#include <3ds.h>
#include <sf2d.h>
#include <stdio.h>

extern const struct {
 unsigned int width;
 unsigned int height;
 unsigned int bytes_per_pixel;
 unsigned char pixel_data[];
} image;

int main(int argc, char **argv)
{
 //Initialize the sf2d lib
 sf2d_init();
 //Set the background color
 sf2d_set_clear_color(RGBA8(0x40, 0x40, 0x40, 0xFF));

sf2d_texture *tex_image = sf2d_create_texture_mem_RGBA8(image.pixel_data, image.width, image.height, TEXFMT_RGBA8, SF2D_PLACE_RAM);

// Main loop
 while (aptMainLoop())
 {
 //Scan all the inputs. This should be done once for each frame
 hidScanInput();

//hidKeysDown returns information about which buttons have been just pressed (and they weren't in the previous frame)
 //hidKeysHeld returns information about which buttons are currently pressed (regardless if they were pressed or not pressed in the previous frame)
 //hidKeysUp returns information about which buttons are not pressed but were pressed in the previous frame
 u32 kDown = hidKeysDown();

if (kDown & KEY_START) break; // break in order to return to hbmenu

sf2d_start_frame(GFX_TOP, GFX_LEFT);
 sf2d_draw_texture(tex_image, 0, 0);
 sf2d_end_frame();
 //Swap the buffers
 sf2d_swapbuffers();
 }
 sf2d_free_texture(tex_image);

sf2d_fini();
 return 0;
}


when i compile I’ve get “sf2d.h” : no such file or directory, so i create an “include” folder with the “sf2d.h” file inside it. now when i try to compile it I get :
“linking sf2d_template.elf
c:/devkitpro/devkitarm/bin/../lib/gcc/arm-none-eabi/4.9.2/../../../../arm-none-e
abi/bin/ld.exe: cannot find -lsf2d
collect2.exe: error: ld returned 1 exit status
make[1]: *** [/c/Users/Robin/Desktop/Dev3ds/sf2d_template/sf2d_template.elf] Err
or 1
make: *** [build] Error 2”
please can anyone help me ?
LikeLike
@Rob
You need to download the latest ctrulib from Smealums github. After you download and extract it, open a cmd window from the location and “make” it. Take the “include” and “lib” folders after it’s finished compiling and paste them into your Devkitpro/libctru folder, overwriting all files. After this sfd2lib should compile properly.
LikeLike
thank you, i will test it on monday
LikeLike